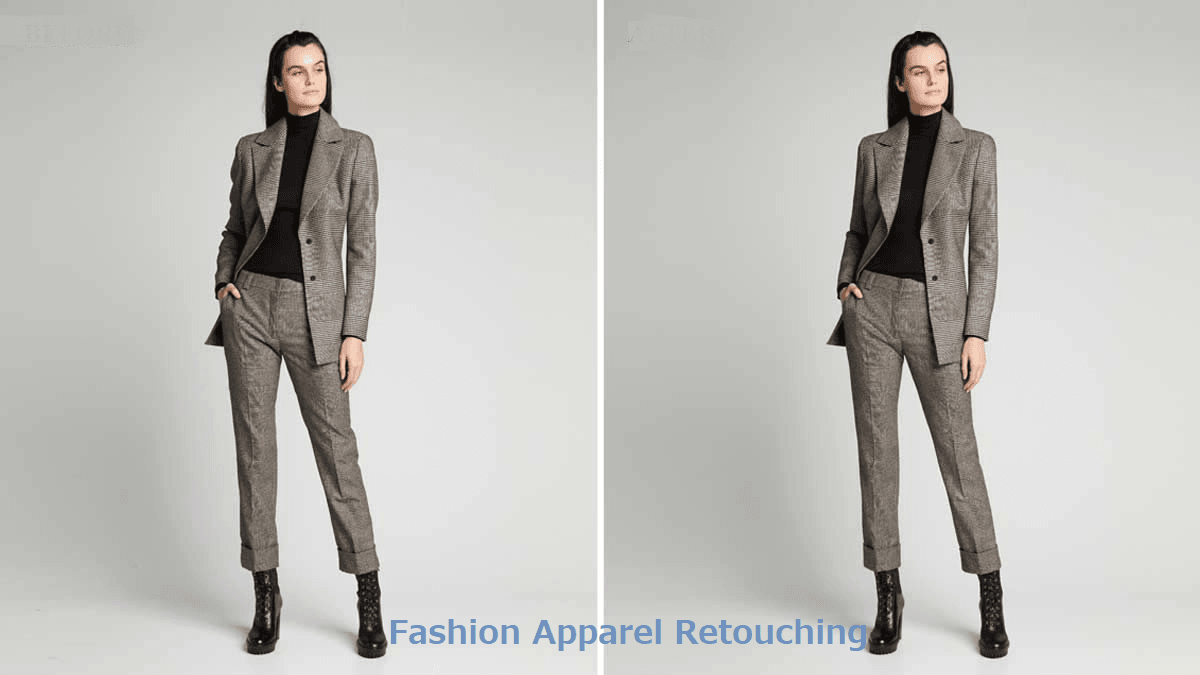
2 Ways to Do Apparel Photo Retouching - Beginner Guide
In this guide, you will learn two ways to perform apparel photo retouching. The first method uses a fast AI-powered online tool for quick results, while the second method explores how to retouch clothing images using Photoshop for more detailed editing.
By Jonna Updated on March 12, 2026
What is Photo Retouching?
Photo retouching refers to the process of improving an image by correcting imperfections and enhancing visual quality. Unlike apparel photo editing, which might involve simple adjustments such as cropping or brightness correction, retouching focuses on refining details within the image itself. In fashion photography, retouching plays a significant role.
Clothing items often require adjustments after the photoshoot because garments may contain wrinkles, uneven lighting, color inconsistencies, or small distractions in the background. Apparel photo retouching specifically focuses on improving clothing and textile images. The goal is to present garments clearly while maintaining realistic fabric texture and shape. Common tasks involved in apparel photo retouching include:
- Removing wrinkles - clothing items often appear wrinkled during photoshoots.
- Color correction - ensuring the fabric color matches the actual product.
- Background cleanup - removing distractions around the clothing item.
- Fabric texture enhancement - making the clothing look more detailed and realistic.
- Lighting adjustments - balancing shadows and highlights.
Easiest Way to Do Apparel Photo Retouching - Online & One-Click
For beginners or small business owners who need quick image refinement, AI-powered online tools provide the easiest way to perform apparel retouching. These platforms analyze images automatically and apply enhancements such as background removal, wrinkle reduction, and color correction. One such tool is UltraPic, an AI-based image editor designed to simplify complex editing tasks.
Create Studio-Quality Photos with AI
Make product images clean, professional and conversion-ready.
- Retouch product photos in one click effortlessly
- Generate eye-catching apparel photos
- Boost clicks and sales with better product images
- No design or editing skills needed, instant result
Instead of manually adjusting every detail, users can upload an image and allow the AI system to analyze the photo. The software identifies clothing elements, improves lighting, and removes distractions in just a few seconds. This automated workflow dramatically reduces editing time and makes professional-looking product photos accessible even to beginners.
In addition to photo retouching, UltraPic includes other tools that make image editing fast and efficient:
- AI-powered background removal for portrait and product photography
- Automatic lighting and color correction
- Object and watermark removal
- Batch editing for multiple product photos
- AI generative fill for adding, replacing, or modifying images
How to use UltraPic to perform apparel photo retouching:
Step 1. Open UltraPic Photo Retouching in your browser and upload your apparel photo.
Step 2. Select Retouching Mode as needed, then click Starting Retouching.
🔴 AI Retouching: Automatically turn ordinary photos into professionally retouched white-background images.
🟢 Studio Retouching: More precision-controlled detail retouching, including smoothness, detail protection, and output image size; suitable for large-sized photos taken by professional photographers.
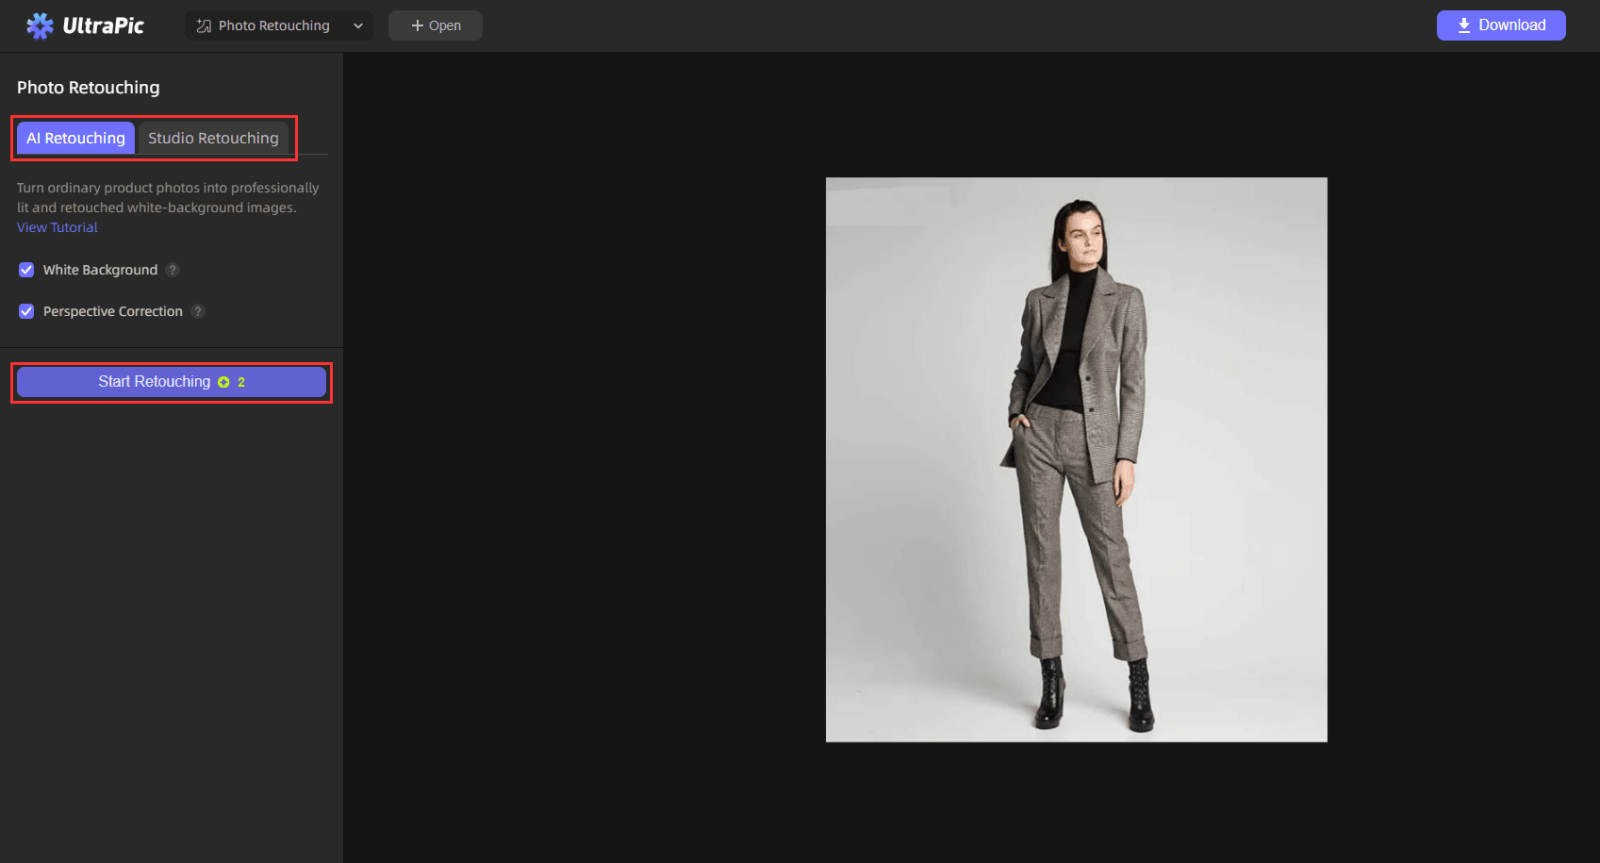
Step 3. When it completes, click Download to save the retouched photo. (PNG for transparency; JPEG for web/catalog).
How to Do Apparel Photo Retouching in Photoshop
While AI tools offer speed and convenience, many professional photographers still rely on Photoshop for detailed editing work. Photoshop provides precise control over every element of an image, making it ideal for advanced fashion retouching, including apparel photo retouching.
With Photoshop, editors can carefully adjust clothing textures, correct colors, remove wrinkles, and enhance shadows for a more realistic appearance. There is no doubt that it is more complicated compared to automated tools. Photoshop includes many powerful tools used in fashion image editing.
- Clone Stamp Tool for removing wrinkles and imperfections
- Healing Brush Tool for smoothing fabric areas
- Dodge and Burn tools for enhancing shadows and highlights
- Liquify Tool for adjusting garment shape
- Frequency Separation for detailed texture editing
- Adjustment Layers for color and contrast correction
How to do apparel photo retouching using Photoshop:
Step 1. Import the clothing photo into Photoshop, and duplicate the background layer to preserve the original image.
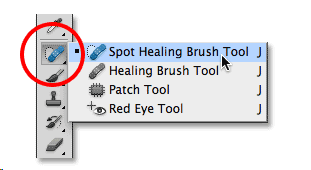
Step 2. Select the Healing Brush Tool from the Toolbar on the left. If you don’t see it, the Healing Brush Tool might be behind the Spot Healing Brush Tool or the Patch Tool.
Step 3. In the Options bar at the top, set the brush size to about twice the size of the deepest wrinkle you want to remove. Set Hardness to 0% and Spacing to about 20%. Make sure the Source is set to Sampled, and the Sample is set to Current Layer.
Step 4. Using the Healing Brush tool, hover the mouse over an area of the fabric without wrinkles, hold down the ALT key, and then click the left mouse button to "sample."
Step 5. Next, "paint" over the wrinkles as you would with the Brush tool. A plus sign (+) will appear above the sampled area, while a circle will appear above the area needing repair. Continuously take new samples as you work to ensure the fabric appears natural after smoothing, rather than flat.
FAQs on Apparel Photo Retouching
#1. How to edit a photo to make clothes more see-through?
Creating transparent or semi-transparent clothing effects usually involves adjusting opacity and blending layers within editing software.
1. Open the clothing image in an editor such as Photoshop.
2. Duplicate the clothing layer for safety.
3. Use layer opacity or blending modes to adjust transparency.
4. Refine shadows and highlights to maintain realism.
#2. How to remove wrinkles from clothes using AI?
AI tools simplify wrinkle removal significantly. The process usually involves uploading the image to an AI editor and selecting a wrinkle removal or enhancement option.
1. Upload the clothing image to an AI retouching platform.
2. Select the wrinkle reduction or smoothing feature.
3. Allow the system to analyze the garment texture.
4. Download the improved image.
Modern AI algorithms detect fabric patterns and smooth out wrinkles while maintaining natural texture.
#3. How long might it take to retouch an apparel photo?
The time required depends on the editing method.
- AI-powered tools can complete apparel photo retouching in less than a minute.
- Basic manual edits may take 5-10 minutes per image.
Large e-commerce stores often prefer automated tools because they significantly reduce editing time for large product catalogs.
Conclusion
Professional clothing images are essential for attracting customers and building trust in online fashion stores. Well-edited visuals highlight fabric texture, remove imperfections, and ensure that garments appear clean and appealing. Learning apparel photo retouching allows photographers, designers, and store owners to improve the quality of their product images significantly.
For beginners, AI-powered tools such as UltraPic provide a fast and accessible solution. With just a few clicks, clothing images can be enhanced, backgrounds removed, and wrinkles minimized.